Serverless
Building a Serverless Contact Form with AWS Lambda
Table of Contents

In this post I’ll be going over how to setup a serverless contact form with AWS Lambda, API Gateway and SES.
1.0 Introduction #
What if I told you it was possible to build apps and run code without needing to worry about running servers, configuring cron jobs, monthly patch cycles, or installing PHP?
In this step-by-step guide I’ll be going over how to setup a ‘serverless’ contact form with AWS Lambda, API Gateway and SES.
2.0 Architecture Overview #

2.1 How does this all work? #
To understand this all, it’s best to split up the functions into client-side and server-side.
On the client-side:
- We have a simple contact form built with HTML and CSS.
- The contact form references Javascript code.
- This Javascript takes inputted data and converts it into JSON.
- JSON data is then submitted to a REST API.
On the server-side:
- The AWS API Gateway service hosts a REST API.
- JSON data sent to the API is forwarded to a Lambda function.
- The Lambda function uses the JSON data to prepare an email.
- The prepared email is sent to AWS SES for delivery to an email address.
Notice how there aren’t any EC2’s or virtual machines running 24/7 to provide functionality? This is why it’s called a ‘serverless’ solution.
2.2 What is serverless? #
Serverless is a term used to describe a family of products that allow us to focus on building solutions and not with the day-to-day running or scaling of backend servers.
For our contact form we will be using the following ‘serverless’ AWS products:
API Gateway is used to provide a highly available and scalable REST API.
Lambda provides us with on-demand and scalable code execution. Behind the scenes, this is powered by AWS’s own Firecracker technology to quickly spin-up and spin-down linux microVM containers. The containers typically start up in under 0.5 seconds and, once running, are billed by the millisecond for usage.
SES is AWS’s scalable email service. We will be using this to send out email from AWS’s trusted IP address ranges.
3.0 Setup Guide #
The deployment should take no more than 20 minutes or so. We will be doing the following:
- Deploying a CloudFormation stack.
- Uploading HTML, CSS and JS files to an S3 bucket.
- Enrolling an email address with AWS SES.
- Updating a Lambda function with a desired destination email address.
3.1 Prerequisites #
You’re going to need:
- A copy of the ‘contact-form’ demo files from my GitHub.
- Your own AWS account.
- An email address to send notifications to.
3.2 CloudFormation Stack Deployment #
In this step we’re going to deploy the backend ‘serverless’ infrastructure.
The deployment is fully automated thanks to AWS’s infrastructure-as-code service, CloudFormation.
Note
Open the AWS Console and browse to CloudFormation.
Select ‘Create stack’ and then ‘With new resources (standard)’.

On the new page, under the ‘Specify template’ section, select ‘Upload a template file’ and then upload the cloudformation-template.yaml you downloaded earlier.
When ready, click Next.

The next couple of pages will provide a number of options:
Stack name
Provide a name for the CloudFormation stack. This can be anything you like. An input is required.
Stack options
This page lets you set a number of options, including tags for the resources made. No input is required here so feel free to click next.
Review stack
A final overview of the deployment options.
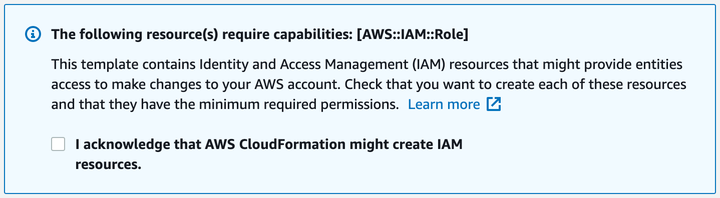
You must tick the “I acknowledge that AWS CloudFormation might create IAM resources” tick box.

Give the CloudFormation stack approximately 5 minutes to fully deploy.
Once deployed, open to the Outputs tab and note the values of ‘APIGatewayURL’, ‘S3BucketName’, ‘LambdaName’, and ‘WebsiteURL’. We’ll need these in the next step.

3.3 Upload to S3 #
In this step, we’ll upload the contact form HTML, CSS and JS files to our S3 bucket.
Note
Open contact.js in your favourite text editor and replace ‘YOUR_URL_HERE’ with the APIGatewayURL from the previous step.

Save your changes and upload the four files to the newly created S3 bucket.
Tip
Once finished your S3 Bucket should look something like this:

3.4 SES Email Verification #
In this step we’re going to verify our email address with SES.
Info
It’s possible to leave the sandbox by contacting AWS support. For this demo, we’ll verify our email address.
Browse to SES (Simple Email Service) within the AWS console.
From the left-hand menu, click on Email Addresses.
Enter the email address you intend to send to:

Approximately 2 - 3 minutes later you should receive an email from AWS asking for verification:

Click on the link to complete email address verification.
3.5 Lambda Config #
Final step, we’re almost there!
The Lambda function created by CloudFormation needs to be updated with the destination email address.
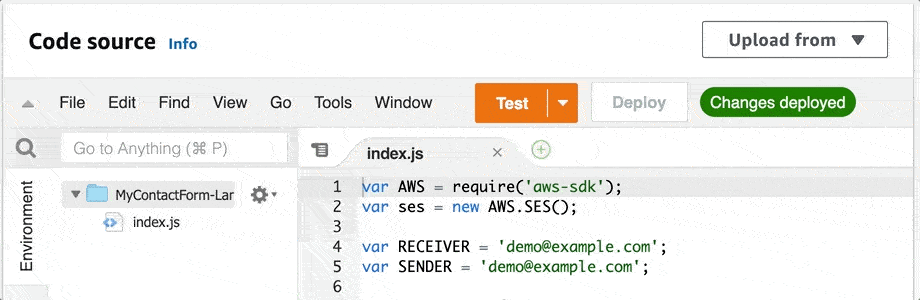
Browse to Lambda within the AWS console and open the function created from step #3.2.
Tip
Scroll down to the Code source section. Replace demo@example.com with your email address.
All done! Let’s move onto testing.
4.0 Testing #
It’s now time to test the contact form.
Browse to the S3 Website URL, fill in the form, and then click submit form.

After 2-3 minutes you should receive an email like so:

If an error message is shown, feel free to drop me a message in the comments below. I’d be happy to help.
Note
Remember to check your junk email.
As this is a demo, we haven’t setup any SPF for our email delivery. If you intend to use this is a ‘real world’ scenario, take a look at SPF records and moving out of the AWS SES sandbox.
5.0 Closing Thoughts #
I hope you find the steps above useful in your projects somehow.
Please note that the steps above are purely for demonstration purposes. Some aspects of the implementation would not be considered ‘best practice’ (e.g. no throttling on the Lambda). Have an improvement suggestion? Please drop me a message in the comments section below.
Thanks for reading!