How to remotely manage IIS on Windows Server Core

Recently whilst trying to configure a WSUS Server Core instance in my lab I needed to change the IIS configuration. On any normal Windows Server that would be an easy task of course, but with Server Core there’s no GUI.
In this quick ‘How To’ post I’ll be covering the steps necessary to remotely manage IIS on Windows Server Core from both a Windows 10 client and via another ‘full fat’ Windows Server computer.
Step 1 – Install the IIS Manager Client
Install the IIS Manager Client onto the computer which will be used to administer the Server Core IIS server. Use the separate sections below depending on whether you are using Windows Server or Windows 10.
Windows Server
Run the following PowerShell command:
| |
Windows 10
Run the following PowerShell command:
| |
This will install the IIS Manager featue. Once it has finished installing download and install ‘IIS Manager for Remote Administration 1.2’ from here.
If prompted, select the relevant msi file for your system. As my client is 64-bit I used inetmgr_amd64_en-US.msi .

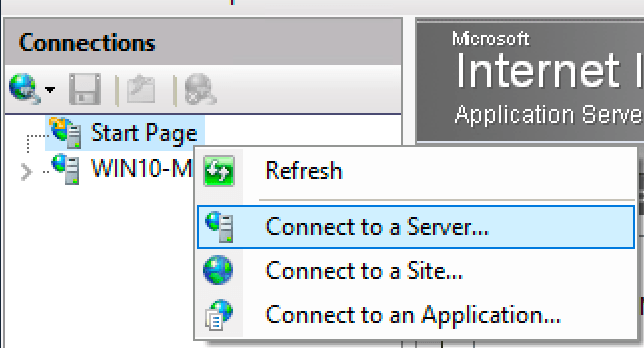
Once installed open the IIS Manager. If everything has worked successfully you should see a section entitled ‘Start Page’. Right-clicking this section will show the option to connect to a server.

Step 2- Configure Remote Access
Connect to the Server Core IIS server via PowerShell Remoting by running the following command:
| |
The session window should now have the remote server name prefixed before each line. Here’s a screenshot from my system:

After entering a remote PowerShell session, the hostname is prefixed before each line.
Now run the following commands in order. This will install the necessary IIS remote management features, allow management traffic through the firewall, and start the IIS remote management service.
| |
Step 3 – Connect to IIS
Now it’s time to actually connect. Back on the client machine, open IIS and right-click on “Start Page” (within the left column). Select “Connect to a Server”.
Follow the wizard by entering the server name without a port number (e.g. “IIS.mydomain.local”) and local administrator credentials. Domain credentials can be used provided they are a member of the IIS servers local administrators group. This includes for instance Domain Admins.
You should now see the remote IIS server showing within the console. Here’s a screenshot from my test machine:

The new ‘IIS’ Server Core server is shown within the IIS Manager console.
Troubleshooting
Sometimes when connecting remotely the error message “Could not connect to he specified computer. Details: The remote server returned an error: (401) Unauthorized” is shown.
To fix this try running the IIS Manager Console on your client machine as an administrator.
Finishing up
You should now be able to manage IIS on Server Core. Please let me know if these steps worked for you and any improvements you can think of in the comments section below.
Thanks!
Comments